This tutorial will show you how to search for TESS mission products in the MAST Portal. We will show you how to perform both pre- and post-search query filtering, how to use the Download Basket, how to use the Interactive Plot Preview tool, and how to specify specific types of products to download.
The Portal is designed to handle searches for small numbers of targets. For those who need to retrieve large numbers of targets or entire collections of data products, consult the tutorials on how to use our programmatic access or bulk download options.
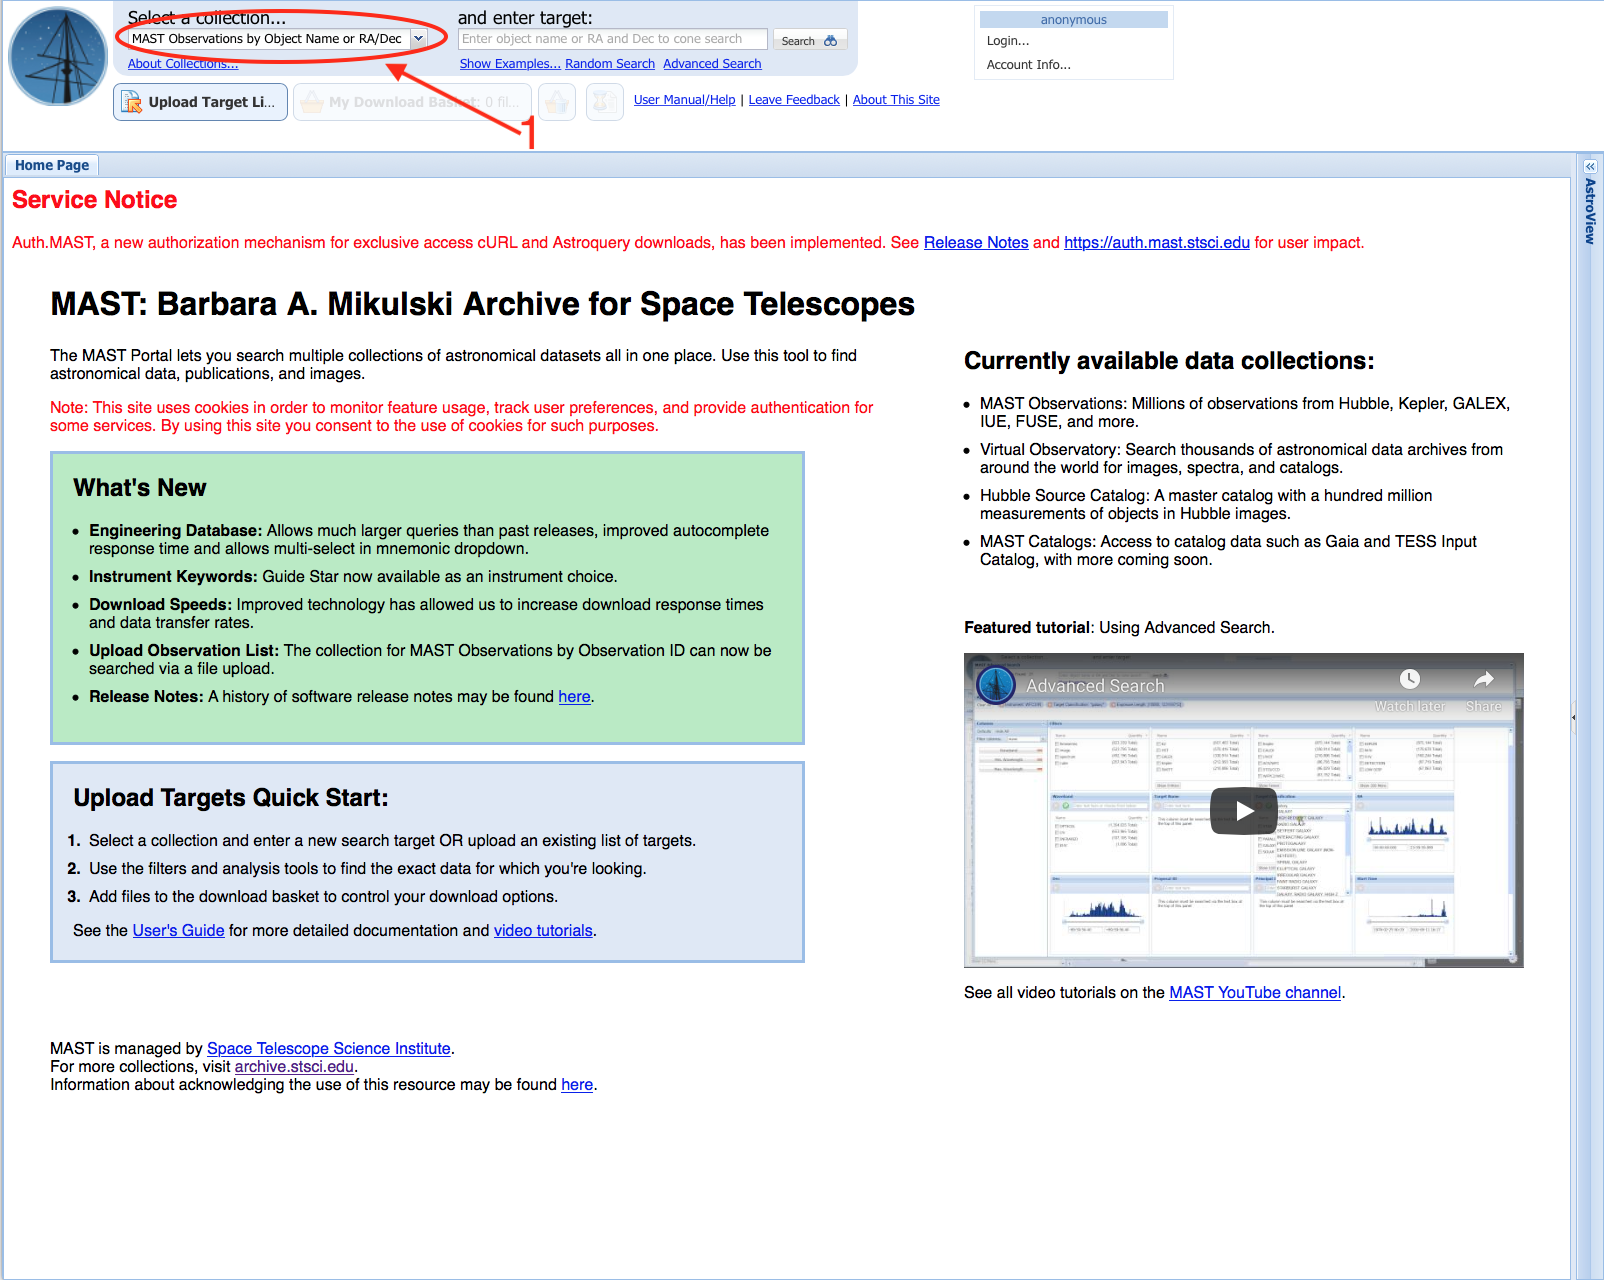
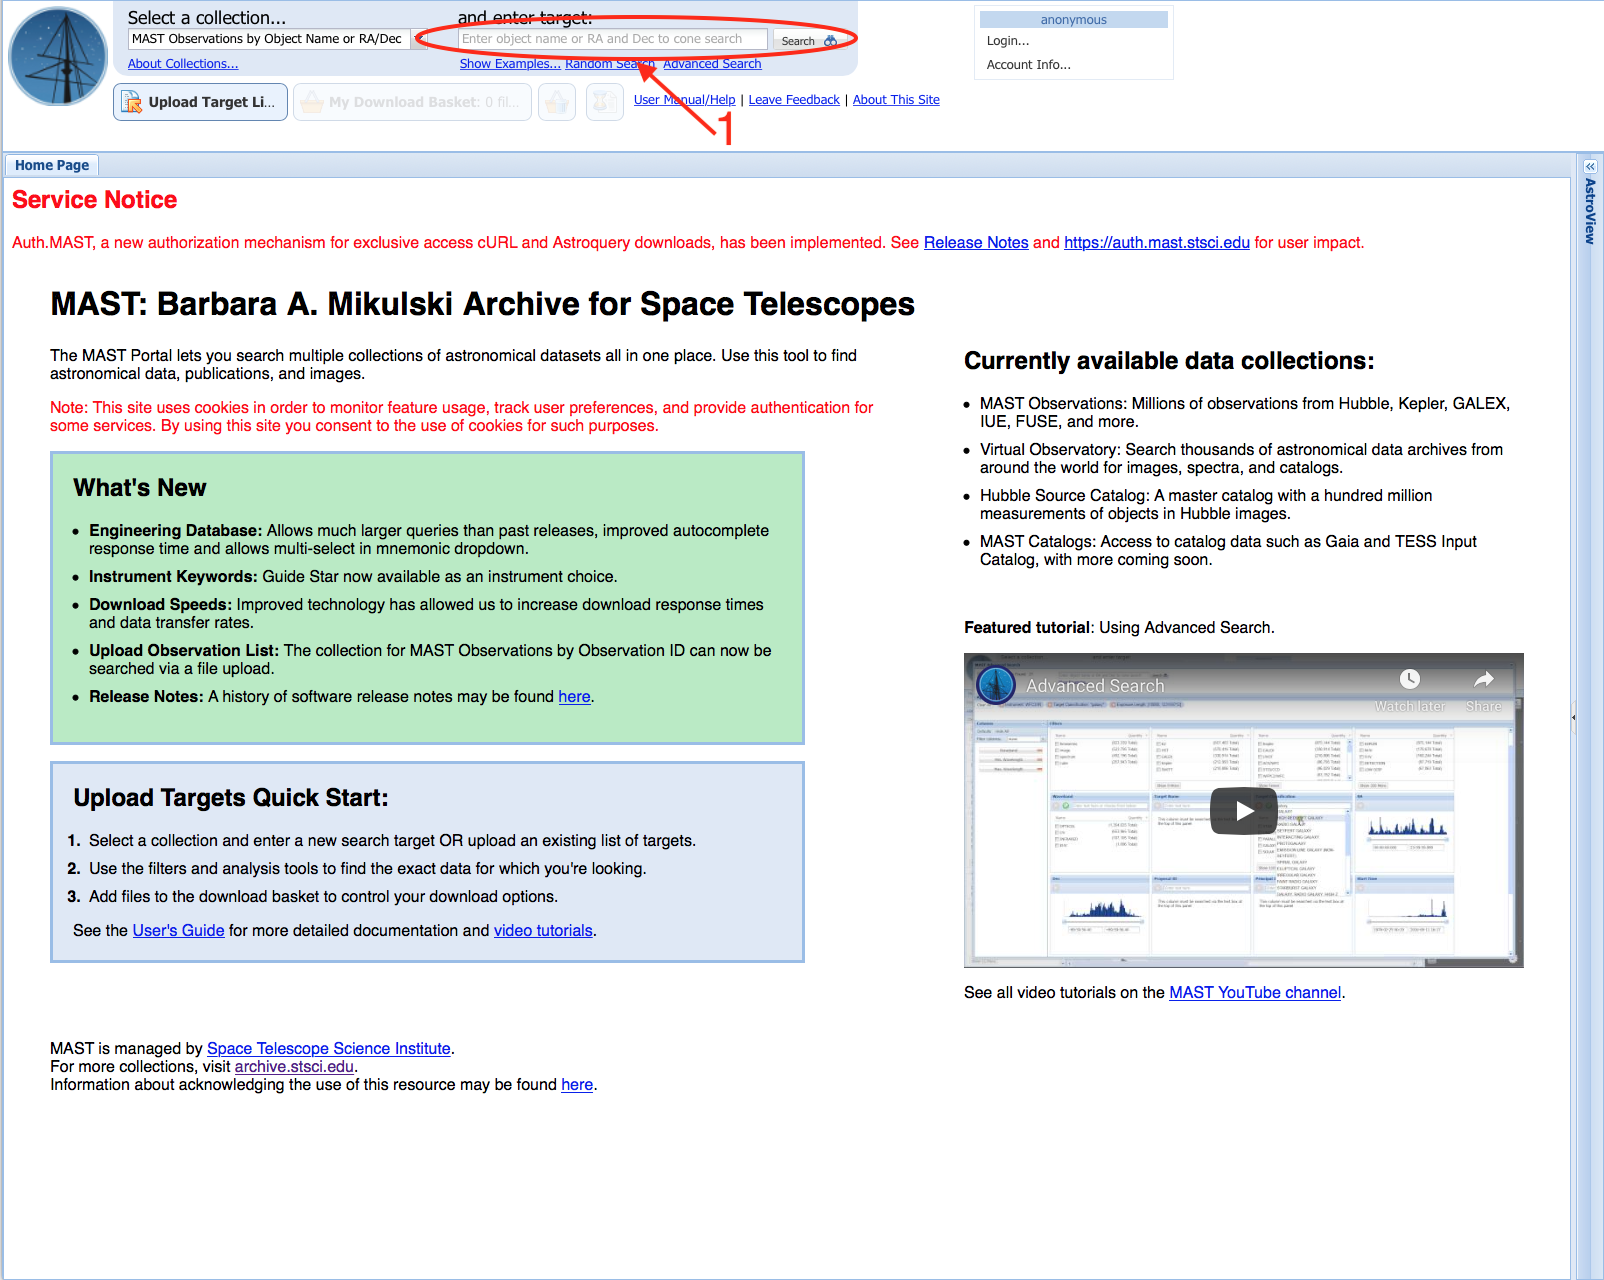
Step 1 - Visit The MAST Portal: The first step is to visit the MAST Portal. At the top-left of the screen is the Collections Drop-Down Menu (Item #1). When searching for TESS mission products (light curves, target pixel files, data validation products, full frame images), make sure this is set to MAST Observations by Object Name or RA/Dec. Note: if you want catalog information from the TESS Input Catalog, you will not find it here! To do a search of the TIC catalog, you will need to change the collection drop-down to MAST Catalogs and then choose "TESS Input" from the second drop-down menu. See the tutorials for searching the TIC for more information on how to search the catalog through the Portal, for this tutorial, we are focussed on searching only the observational products from the mission.
Step 2 - Determine Whether You Want To Do A Pre-Search or Post-Search Query Filter: The Portal allows you to filter your searches in two ways. The first is a pre-search filter, where you specify your search parameters like mission name or filter type, before doing a search on a target name or coordinate. The second is a post-search filter, where you specifcy a target name or search coordinate, get a return of all the available data products that overlap that position, and then have the ability to select a subset of the results. The pre-search filter is best to use when you have a good idea of what you want, e.g., "I want to download all the TESS products for this target." The post-search filter is best to use when you want to know all the available products at MAST, across all missions and High Level Science Products, e.g., "I have this interesting star and I want to know what data exist for this object so I can construct a broad-band SED from the UV to the IR". At this stage in the tutorial, we will show you how to use both options to select only TESS mission products based for our target, so you can see how you might use either in your future searches. As an advanced note, you can also combine the two, e.g., perform a pre-search fitler to get only data products from missions in the optical wavelength regime, and then do a post-search filter to select an even smaller subset once you get the results back.
NOTE: You can click on the images to get full-sized views of the screenshots.
Pre-Search Filter
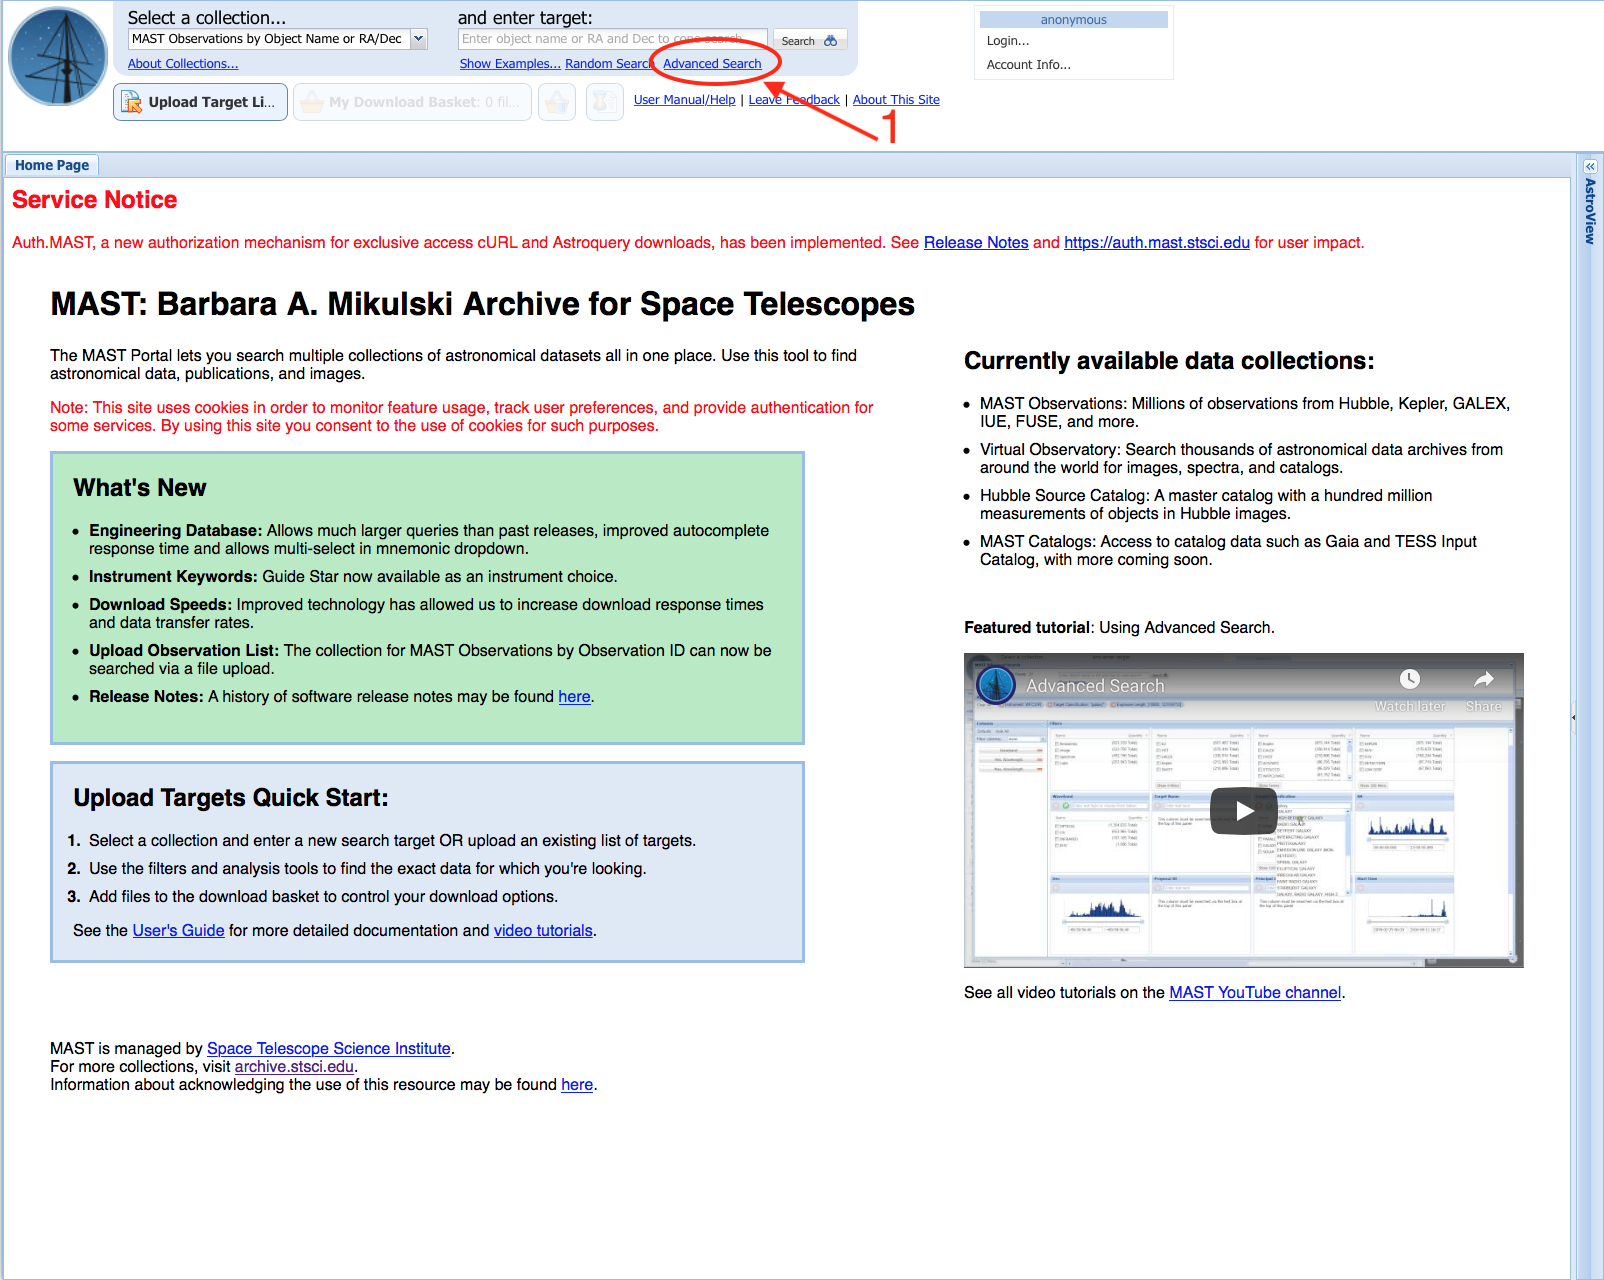
To get to the pre-search filter page, click on the "Advanced Search" link (Item #1) located just below the target search box. You do not need to enter anything into the target search box itself at this point.
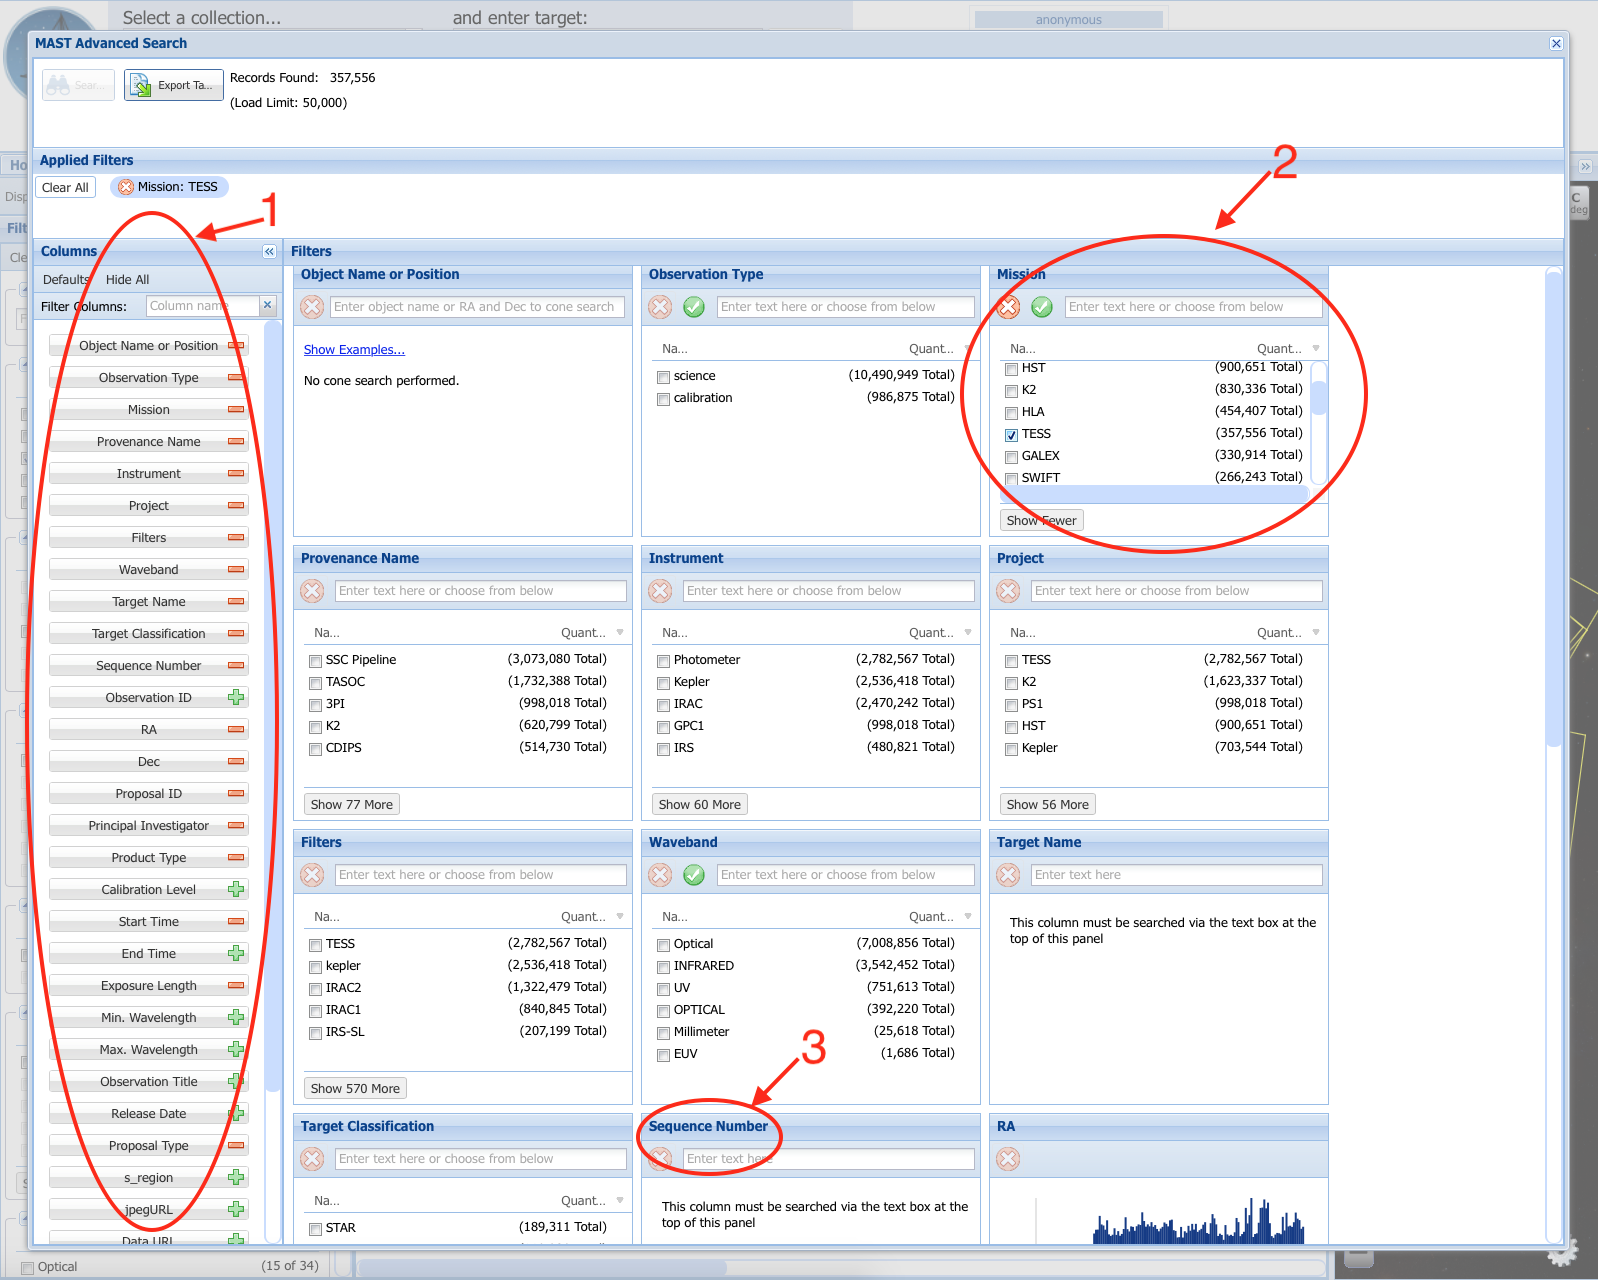
The Advanced Search window is where you can construct your query. On the left are all the available columns you can query on (Item #1). The plus and minus signs will add or remove that column from the grid of filters on the right. By default, some of the most common filters are turned on already. In our tutorial, we want to search for observations from the TESS mission, so we will add "TESS" as a constraint in the Mission panel (Item #2). This is the only constraint we need, other than our target position, but for future reference, another important constraint for TESS users is the Sequence Number panel (Item #3), which for TESS represents the Sector the data were observed in, e.g., a Sequence Number of 4 would add a constraint to only retrieve observations from Sector 4.
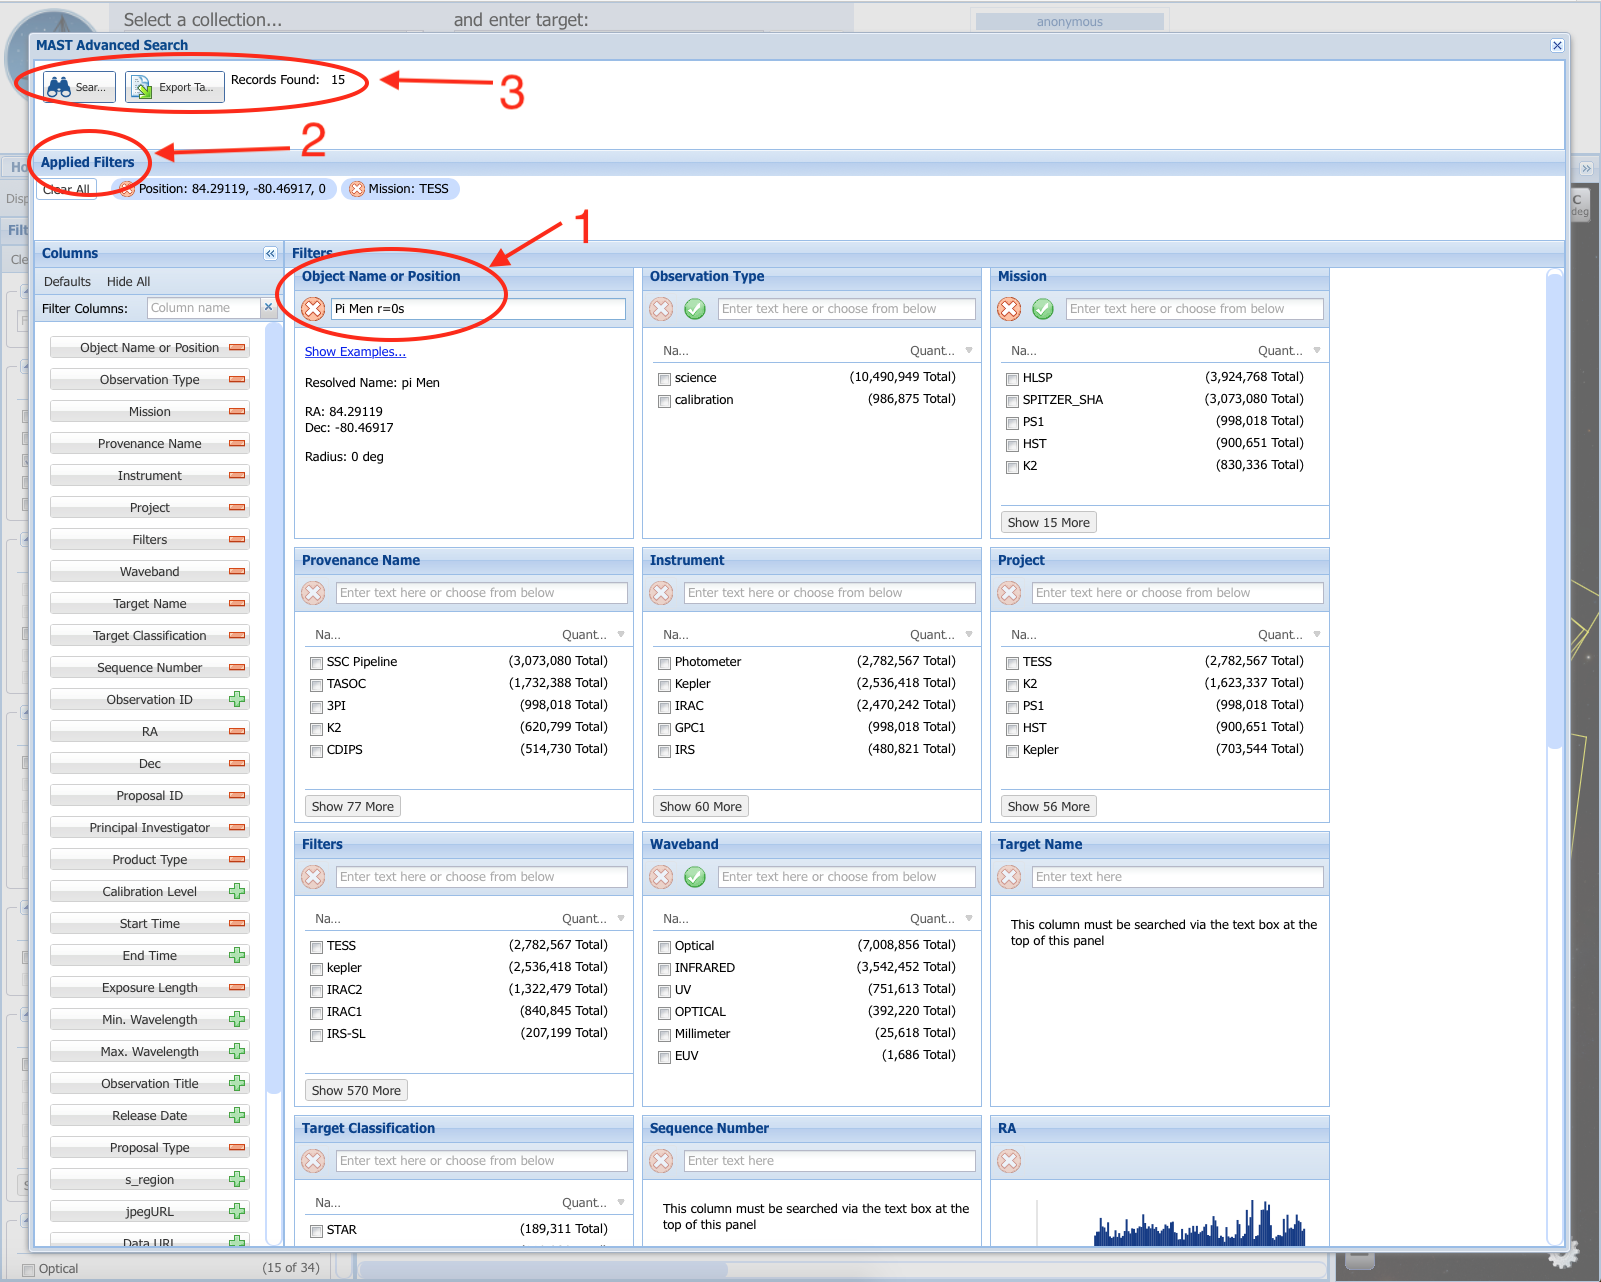
You can include a contraint on position too (Item #1), and in this tutorial we will. We will rely on the name resolving capability of the Portal to search for the star Pi Men, and specify a cone search radius of exactly 0 so that we only get footprints that include exactly this position. See the tutorial notes at the start of the post-search column on the right for a lot more info on how to use specify target positions. Note that for this panel, you must hit enter on your keyboard, or else your constraint will not be applied!
You will notice at the top two rows that will change as you add or remove constraints. The Applied Filters row (Item #2) will show which constraints you've included in your query so far, and you can quickly remove any constraints you want by hitting the red X at the front of each one. At the very top, a total count of the number of returned observations will change as you add or remove query constraints (Item #3). There is a limit on how many observations you can load into the Portal, so the Search button on the far left will remain inactive until your query will result is small enough (currently ~50,000). If you only want to be able to save the metadata of the observations themselves, for example, you just want to get a table of all the TESS observations in some region of the sky, including the coordinates, start and stop times, and Sector numbers, you can export the table of observations using the Export button. This action allows you to export a larger number, so it will be active even for a few hundred thousand rows, but note this will only give you the observational metadata, you won't be able to download any of the files themselves from here.
For the tutorial here, we have cone a cone search centered on Pi Men and have constrained it to only search for TESS products. This has resulted in 15 total observations, which we can easily load back in the main Portal. To do this, press the Search button on the far left, and it will load the results of our query back into the Portal.
Click here to continue the tutorial...
Post-Search Filter
To get to the post-search filters, enter the resolvable name of your target or search coordinate in the target search box (Item #1). Target names can be anything that is resolvable by Simbad or NED, or catalog IDs like "TIC 1234" or "EPIC 1234" or "KIC 1234". Note: if you are referring to specific Kepler, K2, or TESS catalog IDs, you MUST include the catalog string in front, e.g., "TIC 1234" not just "1234", or else you may get a target from a catalog you did not intend! If you want to specificy coordinates, you can enter sexegesimal or decimal degree RA and Dec values (everything is in Equatorial coordinates, there is currently no option to specifiy coordiantes in ecliptic or Galactic coordinates).
Whether you specify a target name or provide coordinates, you can also specify a desired search radius by adding "r=<nn><uu>", for example, "r=5s" performs the search with a five arcsecond radius, while "r=5m" and "r=5d" are five arcminute and five degree search radii, respectively. The Portal can only display so many return observations in a browser, so you should rarely, if ever, specify search radii in degrees doing a post-search filter. Generally it's a good idea to include a small search radius to act as a buffer in case the coordinates in the archive differ slightly from yours, but if you want only those footprints that overlap exactly with your coordinate, you can specifiy "r=0s" to avoid getting any observation footprints that have boundaries that are close to, but do not contain, your coordinate.
For our example, we will enter Pi Men r=0s into the target search box, which will do a search for all MAST archive observations with footprints that contain within them the coordinate returned by the name resolver.
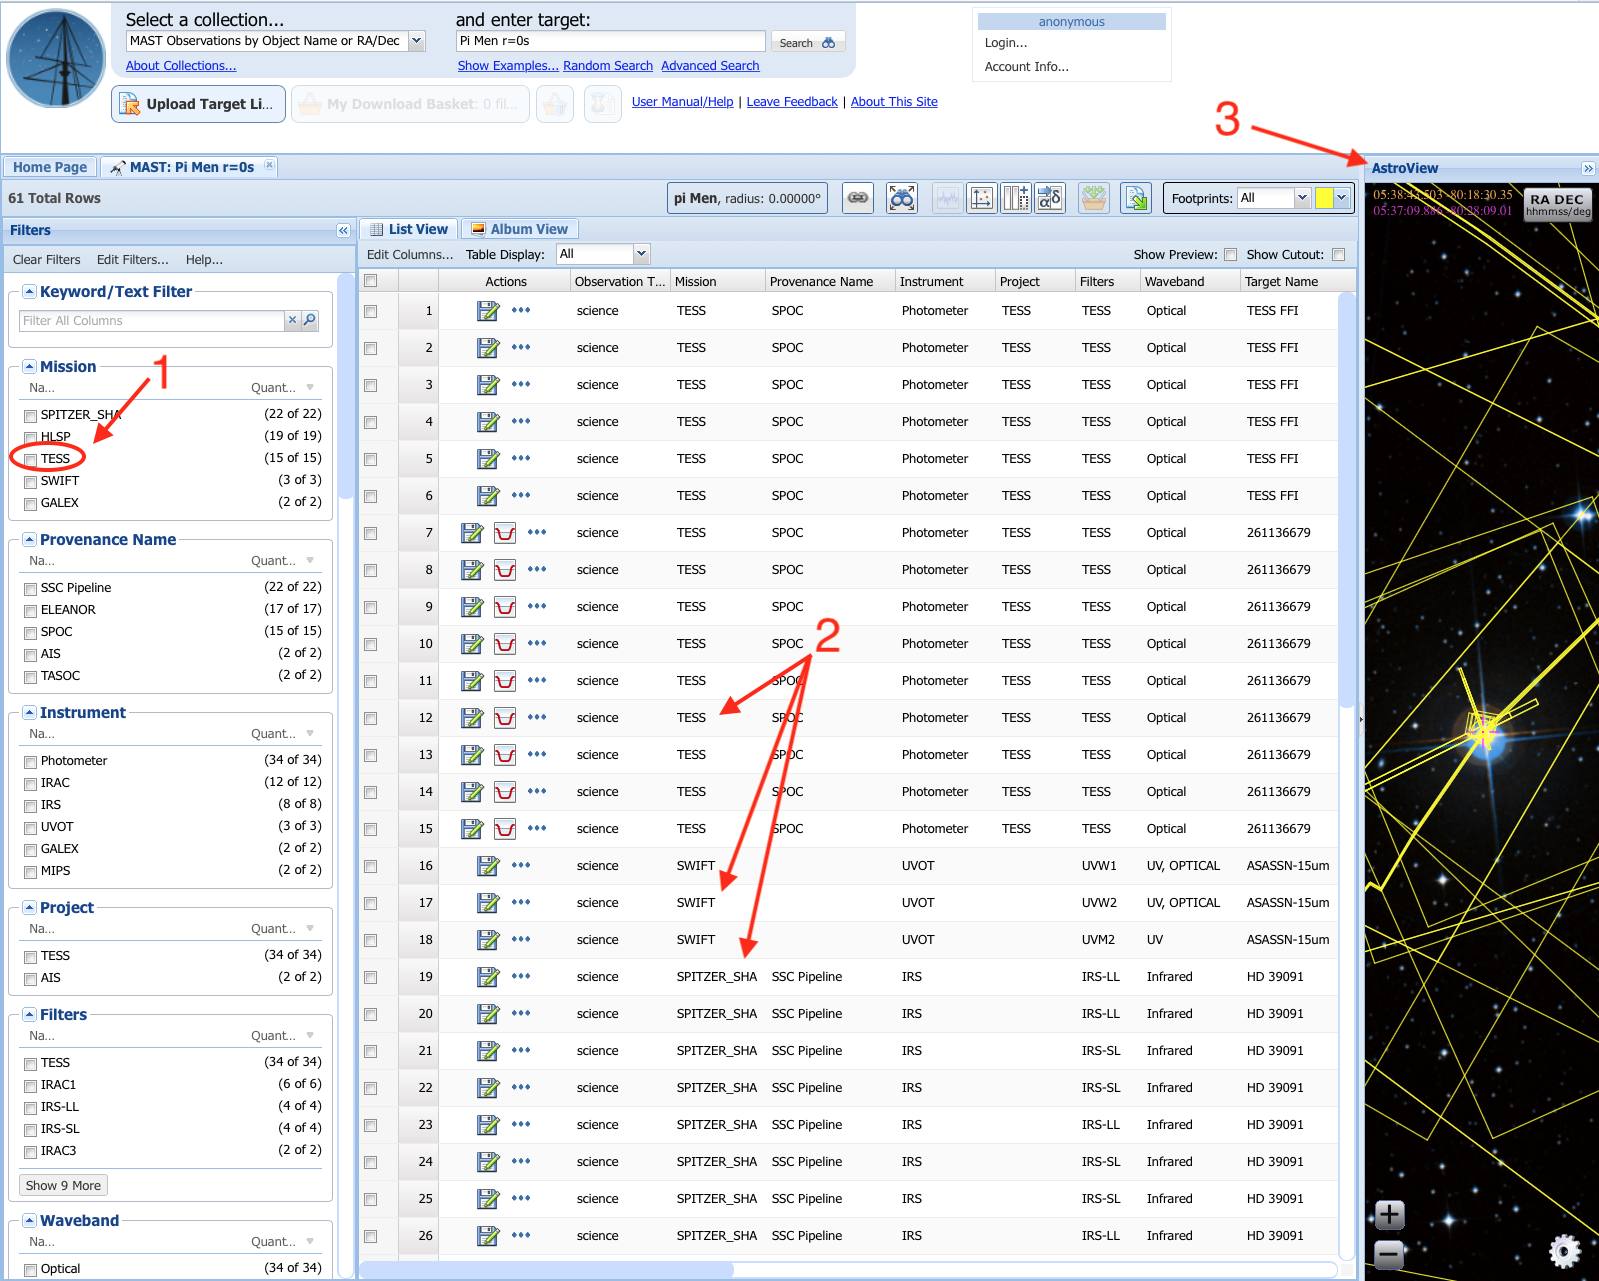
The results of your search are now displayed, across all missions available through MAST. On the left side is the Filter Panel, which allows you to select a subset of the results by applying additional criteria to the returned observations. For our tutorial, we will filter on Mission = TESS (Item #1) to select only those observations from the TESS mission. You will notice that, before you apply this filter, there are a number of additional observations that may or may not be of interest to you (e.g., from Swift and Spitzer) in the Search Results Grid (Item #2). On the right panel is AstroView, which displays the observational footprints on the celestial sky (Item #3).
Click here to continue the tutorial...
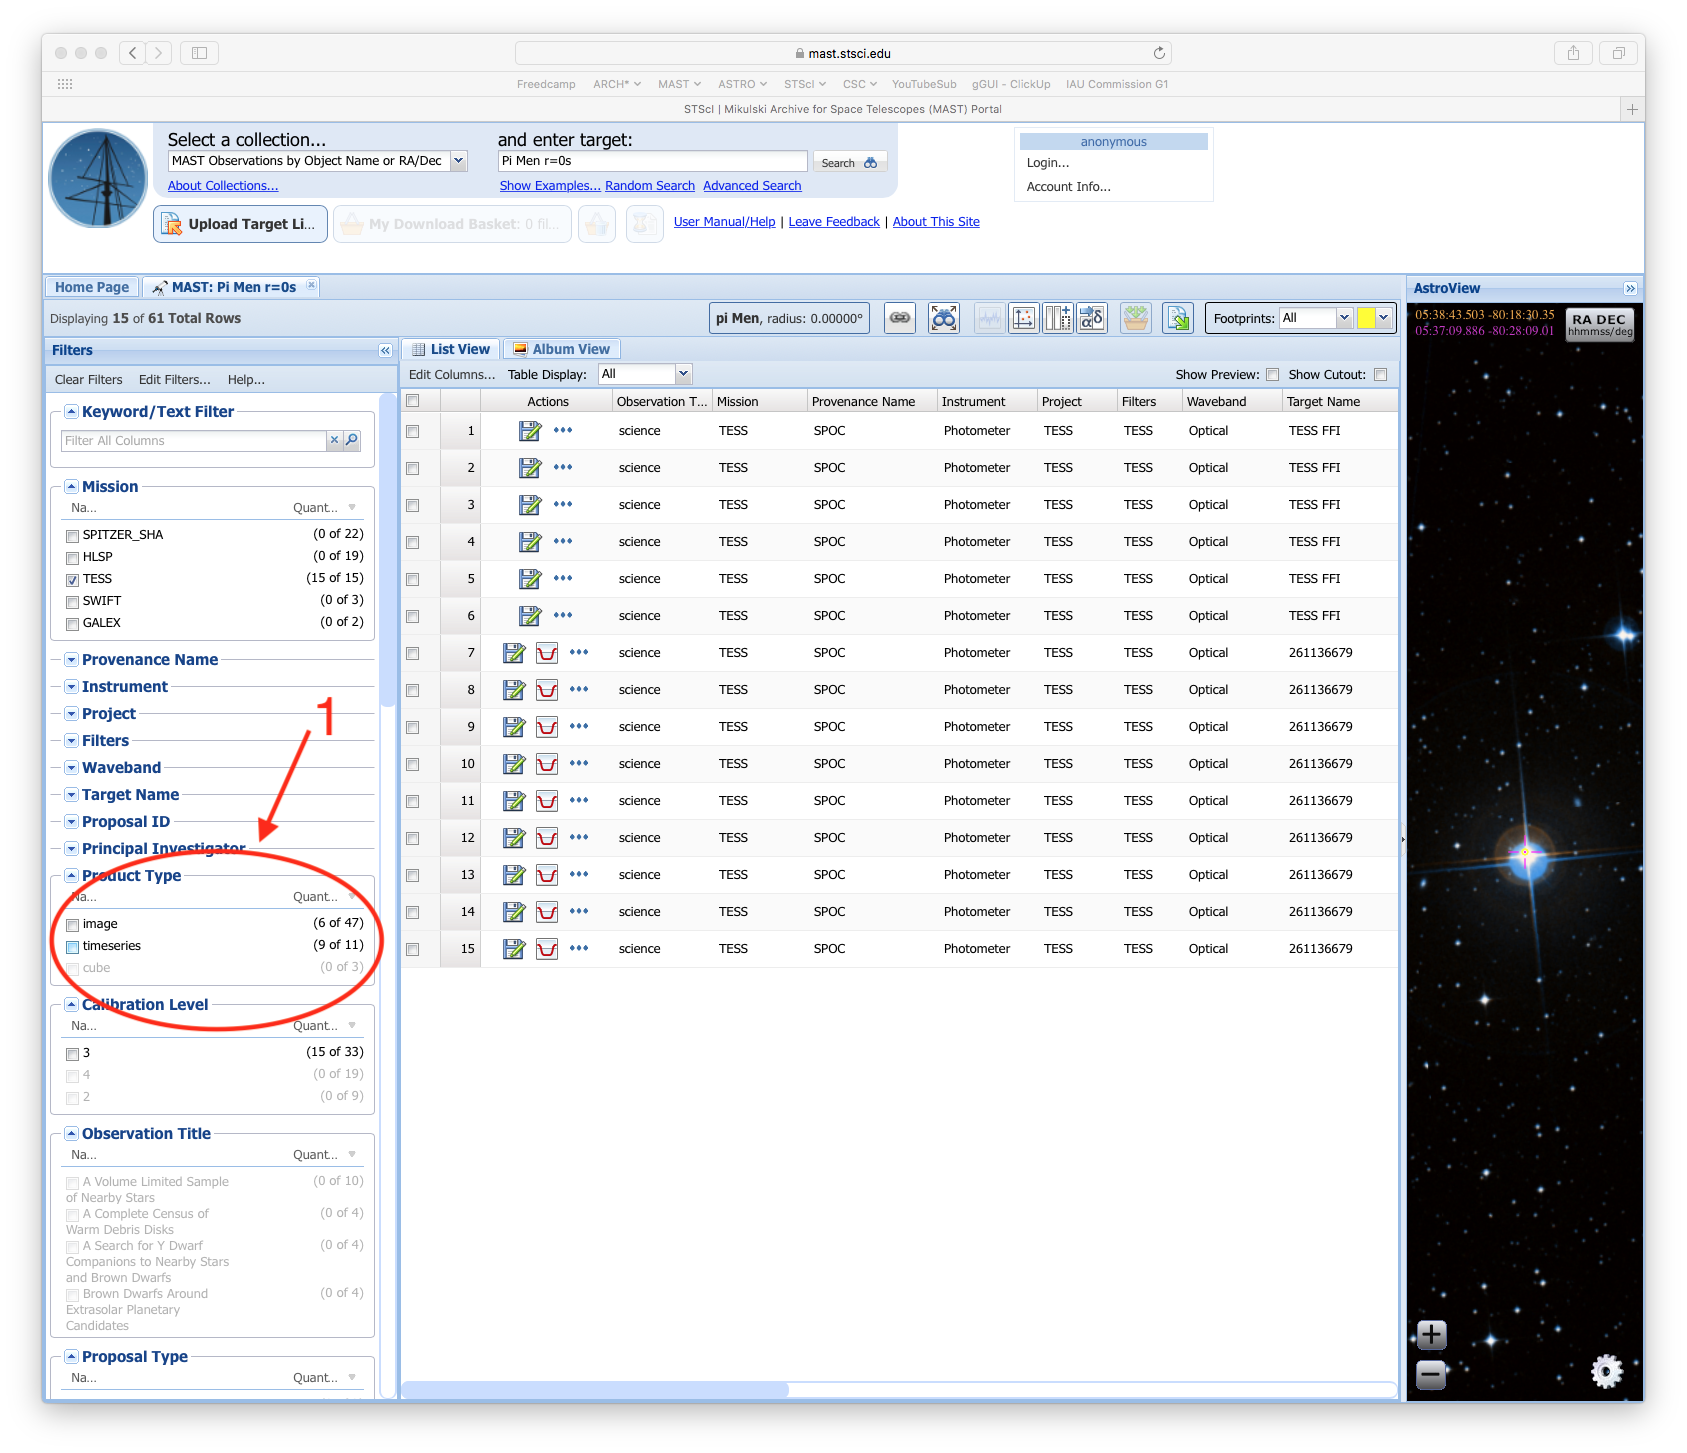
Step 3 - Select The Products You Want: Now that we have a list of all the TESS observational products available, we can select which one's we want. Let's say we are interested in the two-minute cadence data only, so we want to hide the full frame image rows. We can accomplish this using the Filter Panel on the left, and selecting Product Type = timeseries (Item #1). If you are interested in the full frame images, filter on Product Type = image instead. The full frame images are stored in a single Observation (a single row in the search results grid) for a given Sector + Camera + Chip. Each of the two-minute cadence data are also stored in a single Observation for a given Sector. Reminder: for TESS, the Sequence Number column contains the Sector number for a given Observation.
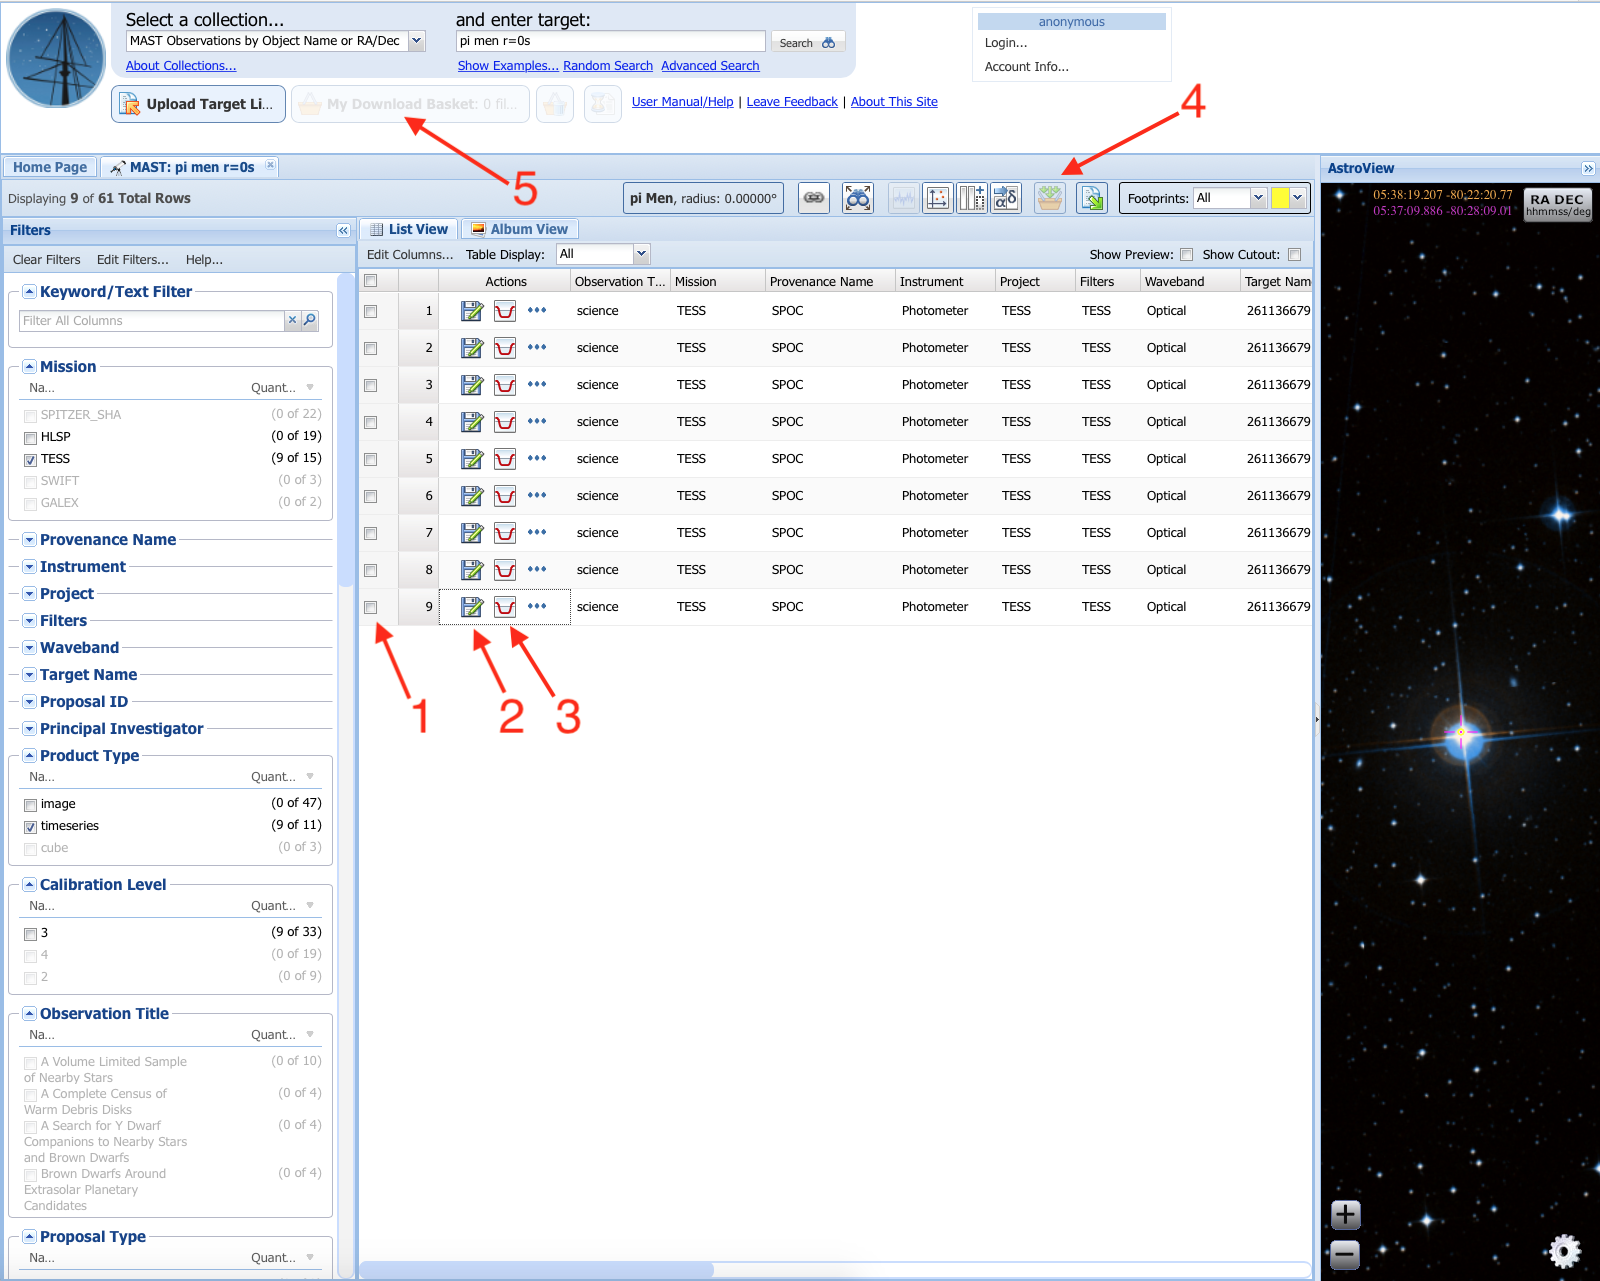
Step 4 - Interact With The Search Results Grid: Now the results grid shows only the TESS two-minute cadence data for our search. We have a number of options here: we can select rows with the checkboxes (Item #1) and add them to the Download Basket using the add-to-basket button (Item #4), if you want to qucikly download a row's main products, you can use the Quick Save icons in front of each row (Item #2). For TESS, the main products are the light curve, target pixel, and data validation files, which will be saved as a zip file containing these products (the location will depend on what OS and browser you are using, the zip file will be saved in the normal location for file downloads for the browser you are using). You can also get a quick preview of the light curve by using the plot icon next to a given row (Item #3), which displays both the SAP and PDCSAP light curves. If you have added any rows to your download basket, you can get to it at any time using the My Download Basket button (Item #5). It works like an online shopping cart: you can add observations from multiple searches within a session and download a single zip file of all the files you want when you are ready.
For this tutorial, we are going to select all the rows (you can select all by using the checkbox at the very top) and add them to our basket, to show how we can use it to specify exactly what kind of data products we want to download. Once you've added the rows to the basket using the add-to-basket button, you will see your basket menu.

