On this page...
Python Environments
The JupyterLab environment is based on miniconda. Like Python, miniconda can have multiple virtual environments, each containing its own isolated software versions. Our JupyterHub system typically has at least two pre-installed environments, which conceptually are:
- generic analysis
- generic analysis + astronomical packages
In general, you will want to use the environment customized for astronomy. The generic option is a "basic" installation of Python, which may not be suitable for your analysis.
JupyterLab Kernels
In Jupyter, kernels are the background processes that execute cells and return results for display. Conda environments can be used to create a kernel, automatically providing all of the packages needed to run a Notebook. If a Notebook fails to import a package you expected, it may be a sign the wrong kernel is running. To select the kernel on which you want to run your Notebook, go to the Kernel menu and choose Change Kernel. You can also click directly on the name of the active kernel to switch to another.
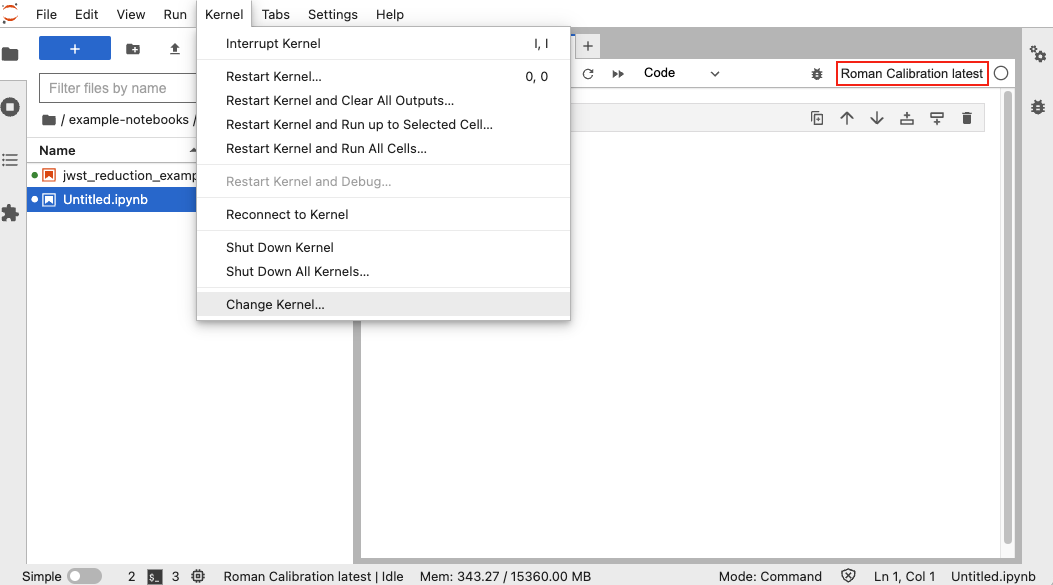
Figure 6 - Switching kernels. The active kernel is boxed in red in the upper right corner.
When the kernel is idle, the circle to the right of the kernel name is unfilled. When the kernel is actively running the Notebook, the circle is filled.
Each kernel maintains the Python state for the currently executing Notebook. This saved state includes imported packages and the values of variables. Consequently, the Kernel menu has numerous options for clearing the state and restarting or continuing Notebook execution.
Pre-installed Software and Temporary Additions
The pre-installed software environment is part of the JupyterLab container. While it can be changed – and software can be installed or removed – the changes do not persist between sessions, and users cannot affect one another. The principal advantage of modifying the pre-installed environments is that, generally, it is fast since there is no need to install dependencies already included in the environment.
Installing additional packages into the pre-existing environments is fairly straightforward. The only real trick is that you must activate the desired installation environment before installing packages. Two equivalent techniques for fast but temporary package installs are shown below.
From a Notebook cell:
To install without leaving your Notebook, enter a command like the following, substituting a real environment name and real package names. The sequence is actually two commands, one which chooses your target environment and a second, nested command which installs packages within the chosen environment. Note the entire command begins with "!" to make it execute as native commands instead of Python commands.
[1]: !conda run -n <pre-installed environment name> pip install <pkg1> <pkg2> ...
Pip-installing packages generally produces copious output that we have omitted here.
From a terminal window:
For those comfortable with using the terminal window, the required commands are a little simpler and clearer. Open a terminal window and type the following, substituting a real environment name and real package names for the placeholders:
$ conda activate <pre-installed environment>
$ pip install <pkg1> <pkg2> ...
As when installing from a Notebook cell, the "pip-installation" will produce copious output that we do not reproduce here.
Persistent User-Installed Software
If the pre-installed environments don't have the software you need, you can create your own persistent environment. available across multiple sessions.
To assist in setting up, using, and deleting persistent user environments, the science platforms provide a set of scripts that manage the details:
| Terminal Command | Examples | Description |
|---|---|---|
| kernel-create | kernel-create <environment-name> [<python-version>] [<lab-display-name>] kernel-create my-tess 3.12 "My Persistent Env" | Executed in a terminal window, kernel-create creates a conda environment located in persistent storage. kernel-create makes a minimal persistent conda environment stored in the $HOME/envs/conda/<environment-name> subdirectory. It also creates a corresponding JupyterLab kernel so the environment is accessible to Notebooks. Because they are stored under your personal $HOME, these environments are not affected by system changes to /opt/conda. Conda environments made this way consume more space than virtual environments but are largely independent of the pre-installed software and other persistent environments. |
| kernel-create-venv | kernel-create-venv <virtual-env-name> [<lab-display-name>] kernel-create-venv my-tess-venv "My Persistent Virtual Env" | Executed in a terminal window, create-kernel-venv creates a Python virtual environment within the active Python environment. kernel-create-venv creates a persistent Python virtualenv stored in the $HOME/envs/venv/<environment-name> subdirectory. It also creates a JupyterLab kernel so the environment can be used in Notebooks. The virtual environment will be created using the version of Python active in the terminal window; for the most stable results, a persistent conda environment should be active when you create a virtual environment. Virtual environments tend to consume less space than typical conda environments by linking to software that is already installed. For the same reason, they also tend to be quicker to install. There is no requirement to use virtual environments, you can stop with conda (documented above) if desired, but some may find them beneficial. |
| kernel-activate | source kernel-activate <env-or-venv-name> source kernel-activate my-tess source kernel-activate my-tess-venv | When sourced into a terminal window, activates the specified user conda or virtual environment. The kernel-activate script will activate the specified <environment-name> for use on the command line. The environment may be either a conda or a virtual environment but must be installed as described above. The Notebook analog to kernel-activate is choosing menu item Kernel → Select Kernel... Not effective for pre-installed conda kernels. |
| kernel-deactivate | source kernel-deactivate <env-or-venv-name> source kernel-activate my-tess source kernel-activate my-tess-venv | When sourced into a terminal window, kernel-deactivate exits the current environment and activates a previously active environment. Not effective for pre-installed conda kernels. |
| kernel-delete | kernel-delete <env-or-venv-name> kernel-delete my-tess kernel-delete my-tess-venv | When executed in a terminal window, delete-kernel deletes a persistent user environment, whether conda or virtual. Not effective for pre-installed conda kernels. |
The commands in the table above establish largely empty environments into which you can then conda or pip install the remainder of your requirements. The environments are immediately accessible as Notebook kernels for you to select and execute Notebooks in.
Other Information
The TIKE project has additional instructions on installing extra software.